使用C++指標傳輸
建立與Unity溝通的結構
C++
struct Circle
{
	//建構子
	Circle(int x, int y, int radius) : X(x), Y(y), Radius(radius) {}
	int X, Y, Radius;
};
編譯器在產生dll檔案時會打亂method名稱,為讓方法保持原名稱,則外顯”C”
Normally, the C++ compiler will mangle the method names when packaging them into a .dll. Therefore, we instruct it to use the classic “C” style of signatures, which leaves the method names just as you wrote them.
extern "C" int __declspec(dllexport) __stdcall Init(int& outCameraWidth, int& outCameraHeight)
extern "C" void __declspec(dllexport) __stdcall Detect(Circle* outFaces, int maxOutFacesCount, int& outDetectedFacesCount)
Circle* outFaces 表an array of Circles。
int& outDetectedFacesCount 表該變數是傳址(ref)。
C#
與C++溝通的格式,變數欄位、宣告順序必需與c++相同
// Define the structure to be sequential and with the correct byte size (3 ints = 4 bytes * 3 = 12 bytes)
[StructLayout(LayoutKind.Sequential, Size = 12)]
public struct CvCircle
{
    public int X, Y, Radius;
}
unsafe:讓你在C#能使用指標。
fixed:使編譯器讓該變數記憶體位置不被garbage collector處理掉。
在fixed區塊中,openCV會直接將變數寫入CvCircle結構陣列中,而省去copy的成本。
void Update()
    {
				//接收陣列大小
        int detectedFaceCount = 0;
        unsafe
        {
            //pass fixed pointer
            fixed (CvCircle* outFaces = _faces)
            {
                OpenCVInterop.Detect(outFaces, _maxFaceDetectCount, ref detectedFaceCount);
            }
        }
}
fixed中只接受:
The legal initializers for a fixed statement are:
- The address operator
&applied to a variable reference. - An array
- A string
- A fixed-size buffer.
分段解析
C++
// Declare structure to be used to pass data from C++ to Mono. (用來與Unity溝通的結構)
struct Circle
{
	//建構子
	Circle(int x, int y, int radius) : X(x), Y(y), Radius(radius) {}
	int X, Y, Radius;
};
CascadeClassifier 是Opencv中做人臉檢測的時候的一個級聯分類器。 並且既可以使用Haar,也可以使用LBP特徵。(源)
C#
// Define the structure to be sequential and with the correct byte size
//(3 ints = 4 bytes * 3 = 12 bytes)
[StructLayout(LayoutKind.Sequential, Size = 12)]
public struct CvCircle
{
    public int X, Y, Radius;
}
StructLayout :C#中StructLayout的特性 - IT閱讀 (itread01.com)
char型資料,對齊值為1,對於short型為2,對於int,float,double型別,其對齊值為4,單位位元組。
初始化鏡頭大小
C++
extern "C" int __declspec(dllexport) __stdcall  Init(int& outCameraWidth,
																										 int& outCameraHeight)
{
	// Load LBP face cascade.
	if (!_faceCascade.load("lbpcascade_frontalface.xml"))
		return -1;

	// 打開鏡頭
	_capture.open(0);
	if (!_capture.isOpened())
		return -2;

	//取得視訊大小
	outCameraWidth = _capture.get(CAP_PROP_FRAME_WIDTH);
	outCameraHeight = _capture.get(CAP_PROP_FRAME_HEIGHT);

	return 0;
}
C#
在Opencv資料夾下找到lbpcascade_frontalface.xml,並放到Unity專案root資料夾下。
				int camWidth = 0, camHeight = 0;
        int result = OpenCVInterop.Init(ref camWidth, ref camHeight);
        if (result < 0)
        {
            if (result == -1)
            {
                Debug.LogWarningFormat("[{0}] Failed to find cascades definition.", GetType());
            }
            else if (result == -2)
            {
                Debug.LogWarningFormat("[{0}] Failed to open camera stream.", GetType());
            }

            return;
        }

        CameraResolution = new Vector2(camWidth, camHeight);
鏡頭大小的變數使用傳址呼叫,讓c++開啟鏡頭後順便設定好大小。使C#和c++使用相同的變數。
傳遞參數scale
C++
extern "C" void __declspec(dllexport) __stdcall SetScale(int scale)
{
	_scale = scale;
}
C#
private const int DetectionDownScale = 1;
void Start()
    {
        ...
        OpenCVInterop.SetScale(DetectionDownScale);
        _ready = true;
    }
辨識人臉
C++
extern "C" void __declspec(dllexport) __stdcall Detect(Circle* outFaces,
																											int maxOutFacesCount,
																											int& outDetectedFacesCount)
{
	Mat frame;
	_capture >> frame;
	if (frame.empty())
		return;

	std::vector<Rect> faces;
	// Convert the frame to grayscale for cascade detection.
	Mat grayscaleFrame;
	cvtColor(frame, grayscaleFrame, COLOR_BGR2GRAY);
	Mat resizedGray;
	// Scale down for better performance.
	resize(grayscaleFrame, resizedGray, Size(frame.cols / _scale, frame.rows / _scale));
	equalizeHist(resizedGray, resizedGray);

	// Detect faces.
	_faceCascade.detectMultiScale(resizedGray, faces);

	// Draw faces.
	for (size_t i = 0; i < faces.size(); i++)
	{
		Point center(_scale * (faces[i].x + faces[i].width / 2), _scale * (faces[i].y + faces[i].height / 2));
		ellipse(frame, center, Size(_scale * faces[i].width / 2, _scale * faces[i].height / 2), 0, 0, 360, Scalar(0, 0, 255), 4, 8, 0);

		// Send to application.
		outFaces[i] = Circle(faces[i].x, faces[i].y, faces[i].width / 2);
		//返回數量用的
		outDetectedFacesCount++;

		if (outDetectedFacesCount == maxOutFacesCount)
			break;
	}

	// Display debug output.
	imshow(_windowName, frame);
}
步驟:
灰階→縮小解析度→直方圖均衡化→偵測
【補充】
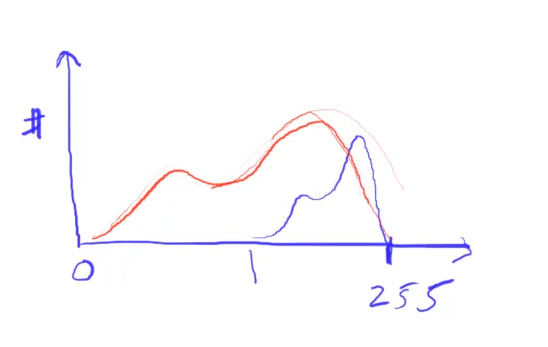
直方圖均衡化(equalizeHist):
將拉伸數值分佈範圍從0-255。假設影像過曝(如藍色曲線),則直方圖均衡化能將其值範圍拉伸0-255區間內,使黑白更分明。 https://youtu.be/jWShMEhMZI4
人臉偵測 (detectMultiScale):
https://blog.csdn.net/leaf_zizi/article/details/107637433
CascadeClassifier.detectMultiScale(輸入圖片, 輸出向量, scaleFactor=1.1 , minNeighbor=3);
輸入圖片: 只接受灰階
scaleFactor:每次圖像縮小的比例,
minNeighbor:每個候選矩形有多少個”鄰居”,我的理解是:一個滑動窗口中的圖元需要符合幾個條件才能判斷為真。
大概意思是Haar cascade的工作原理是一種”滑動視窗”的方法,通過在圖像中不斷的”滑動檢測視窗”來匹配人臉。
因為圖像的圖元有大有小,圖像中的人臉因為遠近不同也會有大有小,所以需要通過scaleFactor參數設置一個縮小的比例,對圖像進行逐步縮小來檢測,這個參數設置的越大,計算速度越快,但可能會錯過了某個大小的人臉。
其實可以根據圖像的圖元值來設置此參數,圖元大縮小的速度就可以快一點,通常在1~1.5之間。
那麼,經過多次的反覆運算,實際會檢測出很多很多個人臉,這一點可以通過把minNeighbors 設為0來驗證。
所以呢,minNeighbors參數的作用就來了,只有其”鄰居”大於等於這個值的結果才認為是正確結果。
返回Rect ,其包含<x,y,w,h>
使用UDP
Python 傳送資料
import numpy as np
import cv2
import socket

UDP_IP = "127.0.0.1"
UDP_PORT = 5065

sock = socket.socket(socket.AF_INET, socket.SOCK_DGRAM)

while true:
    sock.sendto( ("data!").encode(), (UDP_IP, UDP_PORT) )
    print("data sent")

capture.release()
cv2.destroyAllWindows()
C# UPD 建立連線
// 1. Declare Variables
    Thread receiveThread;  //在背景持續接受UDP訊息
    UdpClient client;   // parse the pre-defined address for data
    int port;   //port number

// 2. Initialize variables
    void Start()
    {
        port = 5065;
        InitUDP();
    }

    // 3. InitUDP
    private void InitUDP()
    {
        print("UDP Initialized");
        receiveThread = new Thread(new ThreadStart(ReceiveData)); //開個新的帶有參數的thread,傳入方法當參數
        receiveThread.IsBackground = true;
        receiveThread.Start();
    }
C# 定義接受方法
// 4. Receive Data
    private void ReceiveData()
    {
        client = new UdpClient(port); //指定port
        while (true)
        {
            try
            {
                IPEndPoint anyIP = new IPEndPoint(IPAddress.Parse("0.0.0.0"), port); //任何ip
                byte[] data = client.Receive(ref anyIP); //資料

                string text = Encoding.UTF8.GetString(data); //binary => utf8 text
                print(">> " + text);
								//....
            }
            catch (Exception e)
            {
                print(e.ToString());
            }
        }
    }
使用TCP
需經過三項交握確認連線。
若server(這裡是unity)的port沒有開,會收到傳送失敗的exception。
Python 建立連線
import numpy as np
import cv2
import socket

TCP_IP = "127.0.0.1"
TCP_PORT = 5066

#sock = socket.socket(socket.AF_INET, socket.SOCK_DGRAM) # SOCK_DGRAM 長度限制 548bytes,但不需要預先connect
sock = socket.socket(socket.AF_INET, socket.SOCK_STREAM) # TCP

#TCP連線
address=(TCP_IP ,TCP_PORT )
sock.connect(address)

print('sock init')
sock.send('Hi'.encode('utf-8'));

sock.close() #才會把累積的資料傳送
C# 建立連線
public class ImageReceiver : MonoBehaviour
{
    //TCP Port 開啟
    Thread receiveThread;
    TcpClient client;
    TcpListener listener;
    int port;
    private void Start()
    {
        InitTcp();
    }
    void InitTcp()
    {
        port = 5066;
        print("TCP Initialized");
        IPEndPoint anyIP = new IPEndPoint(IPAddress.Parse("127.0.0.1"), port);
        listener = new TcpListener(anyIP);
        listener.Start();
				//開個新的帶有參數的thread,傳入方法當參數
        receiveThread = new Thread(new ThreadStart(ReceiveData));
        receiveThread.IsBackground = true;
        receiveThread.Start();
    }
    private void OnDestroy()
    {
        receiveThread.Abort();
    }
}
定義接收方法
private void ReceiveData()
    {
        print("received somthing...");
        try
        {
            while (true)
            {
                client = listener.AcceptTcpClient();
                NetworkStream stream = new NetworkStream(client.Client);
                StreamReader sr = new StreamReader(stream);
                print(sr.ReadToEnd());
            }
        }
        catch (Exception e)
        {
            print(e);
        }
    }
注意1,由於一開始需要經過三項交握,所以”TCP Initialized”之後會log一次”received something…”,該訊息為用來回應tcp連線的。
注意2,在python端sock.close()之前收到的訊息會一直存在sr,直到close之後才一次print出,所以傳輸每frame都會經過:建立連線=>打包資料=>傳送=>close() 的循環。
傳輸畫面
Python 端
注意資料只能傳byte,string等型態,所以這邊使用json格式。Python有另一個類次的pickel插件,但該格式只能python使用,不方便給unity。
while cap.isOpened():
    ret, img = cap.read()
    img_data={'image':cv2.imencode('.jpg',img)[1].ravel().tolist()}
    data=json.dumps(img_data);

    #準備連線
    sock = socket.socket(socket.AF_INET, socket.SOCK_STREAM) # TCP
    sock.connect(address)

    #傳送資料
    sock.sendall(bytes(data,encoding='utf-8'))
    #print('sock sent')

    cv2.imshow("Image",img)
    cv2.waitKey(10)
    sock.close()
C# 端
宣告texture:
public class ImageReceiver : MonoBehaviour
{
    //TCP Port 開啟
    Thread receiveThread;
    TcpClient client;
    TcpListener listener;
    int port;
    private void Start()
    {
        InitTcp();
    }
    void InitTcp()
    {
        port = 5066;
        print("TCP Initialized");
        IPEndPoint anyIP = new IPEndPoint(IPAddress.Parse("127.0.0.1"), port);
        listener = new TcpListener(anyIP);
        listener.Start();
				//開個新的帶有參數的thread,傳入方法當參數
        receiveThread = new Thread(new ThreadStart(ReceiveData));
        receiveThread.IsBackground = true;
        receiveThread.Start();
    }
    private void OnDestroy()
    {
        receiveThread.Abort();
    }
}
由於Unity不支援多線程,無法在接收方法中直接設定texture,所以在fixedUpdate中設定。
private void FixedUpdate()
    {
        tex.LoadImage(imageDatas);
        img.texture = tex;
    }