前言
最近在重製自己的網頁,為了有更好的展示空間,所以也順便做了文章的縮圖編輯器。本系統基於 React 框架,但大部分是由 Js 實現,輕鬆移植到不同平台。
使用componentDidMount
React 生命週期中, componentDidMount 是在 render() 結束後呼叫,可用於建立該元件的基本參數,在此用來呼叫抓取 DOM 物件 (因為在 render 之前該 DOM 物件並不存在)。
const openEditor = () => {
  var canvas = document.getElementById("avatarCanvas"),
    context = canvas.getContext("2d");
}

class AvatarEditor extends React.Component {
  state = {};
  constructor(props) {
    super(props);
    this.state = this.props;
  }
  componentDidMount() {
    openEditor();
  }
  render() {
    return (
      <div>
        <canvas
          id="avatarCanvas"
          width="500"
          height="500"
          className="avatarEditor-canvas"
        ></canvas>
      </div>
    );
  }
}
設定 React Component 預設值
在上面我們創了一個繼承自 React.Component 的類別 AvatarEditor 。
設定該元件的預設值可使用類別 .defaultProps :
AvatarEditor.defaultProps = {
  img: "https://react.semantic-ui.com/images/wireframe/image.png",
  scale: 100,
  width: 100,
  height: 100,
  top: 0,
  left: 0,
  //preview大小
  previewSize: 300,
  onsubmit: (e) => {
    console.log("submit");
  },
  oncancel:(e)=>{
    //取消
  }
};
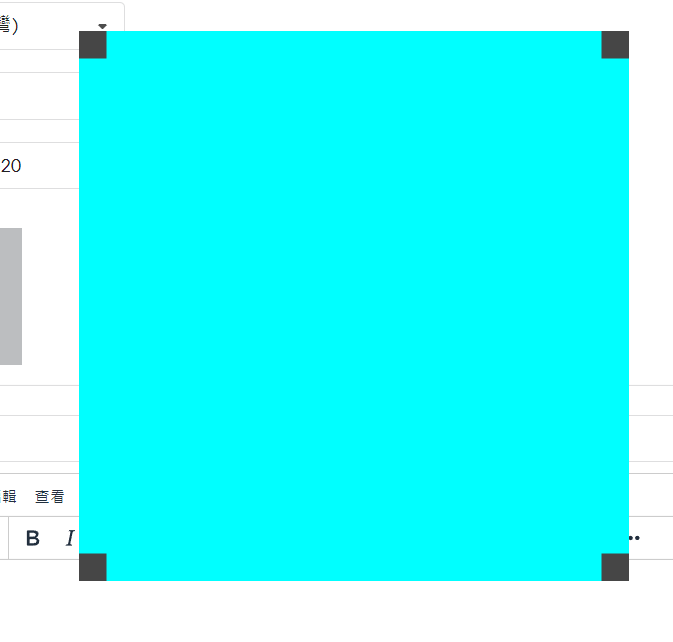
畫四個角的控制器
import React from "react";
import "../Css/AvatarEditor.css";

const openEditor = () => {
  var canvas = document.getElementById("avatarCanvas"),
    context = canvas.getContext("2d"),
    width = canvas.width,
    height = canvas.height;

	//因為rect是左上為中心開始畫
  var controllerSize = 25;
  var rectSize = 500 * (1 - controllerSize / width);

  //四個角落
  var points = [
    { x: 0, y: 0 },
    { x: 1, y: 0 },
    { x: 1, y: 1 },
    { x: 0, y: 1 },
  ];

  renderPoints();
  function update() {}

  function renderPoints() {
    context.clearRect(0, 0, width, height);
    for (var i = 0; i < points.length; i++) {
      var p = points[i];
      context.fillStyle = "#464646";
      context.beginPath();
      context.rect(p.x * rectSize, p.y * rectSize, 25, 25);
      context.fill();
    }
  }

  console.log(canvas);
};

class AvatarEditor extends React.Component {
  state = {};
  constructor(props) {
    super(props);
    this.state = this.props;
  }
  componentDidMount() {
    openEditor();
  }
  render() {
    return (
      <div>
        <canvas
          id="avatarCanvas"
          width="500"
          height="500"
          className="avatarEditor-canvas"
        ></canvas>
      </div>
    );
  }
}

export default AvatarEditor;
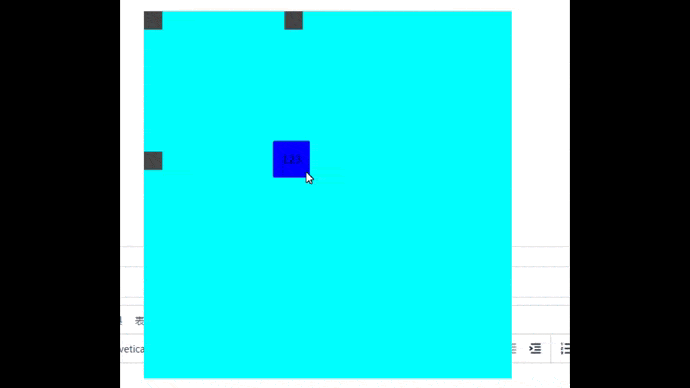
拖拉控制
透過控制對角線的x與y的位置,一同移動其餘的三個控制點。
var controllerSize = 25;
  var controllerSizeRatio = controllerSize / width;
  var rectSize = 500 * (1 - controllerSizeRatio);

  //四個角落
  var points = [
    { x: 0, y: 1 },
    { x: 0, y: 0 },
    { x: 1, y: 0 },
    { x: 1, y: 1 },
  ];

var isDraggingController = false;

  //右下控制器
  var sizeController = document.getElementById("sizeController");
  sizeController.onmousedown = function (e) {
    e.preventDefault();
    isDraggingController = true;
  };

document.body.addEventListener("mousemove", function (event) {
    //移動size controller位置
    if (isDraggingController) {
      var mousePos = getMousePos(canvas, event);
      var moveRate = 1 - mousePos.y / rectSize;
      sizeController.style.right = moveRate * 100 + "%";
      sizeController.style.bottom = moveRate * 100 + "%";

      //修改其他點位置:
      points[0].y = 1 - controllerSizeRatio - moveRate;
      points[2].x = 1 - controllerSizeRatio - moveRate;
    }
  });

....
render() {
    return (
      <div className="avatarEditor-root">
        <canvas
          id="avatarCanvas"
          width="500"
          height="500"
          className="avatarEditor-canvas"
        ></canvas>
        <button
          id="sizeController"
          className="avatarEditor-controller"
          onClick={(e) => {
            e.preventDefault();
          }}
        >
          123
        </button>
      </div>
    );
  }
拖拉位置
透過改變與父物件相對位置的 top , left 值實現移動的效果。
//位置控制器
  var positionController = document.getElementById("positionController");
  positionController.onmousedown = function (e) {
    e.preventDefault();
    is_gragging_reposisiton_controller = true;
    previous_mouse_pos=getMousePos(canvas,e);
  };
  //位置控制器--原本mouse位置
  var previous_mouse_pos = { x: 0, y: 0 };

document.body.addEventListener("mousemove", function (event) {
    //改變size
    if (is_gragging_resize_controller) {
      var mousePos = getMousePos(canvas, event);
      var moveRate = 1 - mousePos.y / rectSize;
      sizeController.style.right = moveRate * 100 + "%";
      sizeController.style.bottom = moveRate * 100 + "%";

      //修改其他點位置:
      points[0].y = 1 - controllerSizeRatio - moveRate;
      points[2].x = 1 - controllerSizeRatio - moveRate;
      points[3].x = 1 - controllerSizeRatio - moveRate;
      points[3].y = 1 - controllerSizeRatio - moveRate;

      //修改選擇範圍
      positionController.style.height = (points[0].y - points[1].y) * 100 + "%";
      positionController.style.width = (points[2].x - points[0].x) * 100 + "%";

      positionController.style.top = points[1].y * 100 + "%";
      positionController.style.left = points[0].x * 100 + "%";
    }

    //移動選取位置
    else if (is_gragging_reposisiton_controller) {
      var mousePos = getMousePos(canvas, event);
      //offset轉成%數
      var offsetX = (mousePos.x - previous_mouse_pos.x) / rectMaxSize;
      var offsetY = (mousePos.y - previous_mouse_pos.y) / rectMaxSize;

      //移動每個points
      for (var i = 0; i < points.length; i++) {
        var p = points[i];
        p.x += offsetX;
        p.y += offsetY;
        console.log(p);
        points[i] = p;
      }
      //移動resize按鈕
      sizeController.style.right =
        (1 - points[3].x - controllerSizeRatio) * 100 + "%";
      sizeController.style.bottom =
        (1 - points[3].y - controllerSizeRatio) * 100 + "%";

      //移動inner範圍
      positionController.style.top = points[1].y * 100 + "%";
      positionController.style.left = points[0].x * 100 + "%";

      previous_mouse_pos = mousePos;
    }
  });
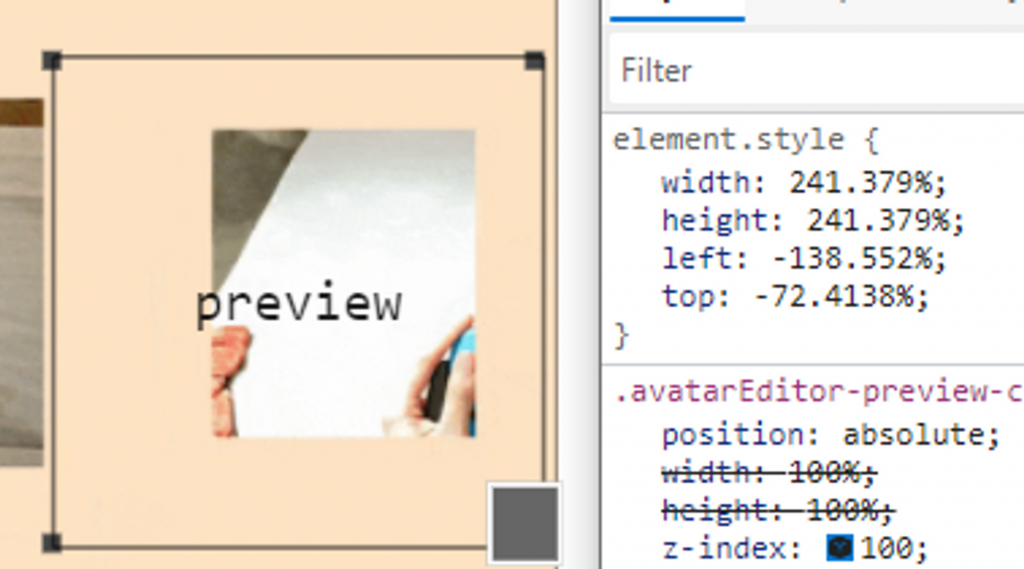
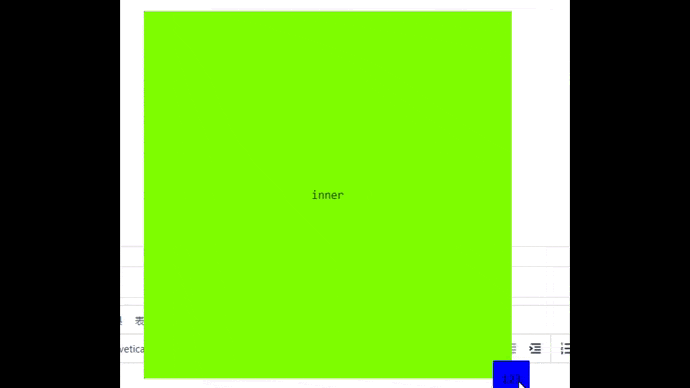
同步操作縮圖位置
同樣在操作預覽圖片的 top , left 值達到效果。
{/* 預覽 */}
<div
	className="avatarEditor-preview-container"
  id="preview"
  style={{ height: this.state.previewSize, width: this.state.previewSize }}
 >
  <img src={this.state.img} id="avatarEditor-preview-img"></img>
</div>

function updatePreviewImg() {
    var previewWidthRatio = 1 / (points[3].x - points[1].x);
    previewImg.style.width = previewWidthRatio * 100 + "%";
    previewImg.style.height = previewWidthRatio * 100 + "%";
    previewImg.style.left = -points[0].x * previewWidthRatio * 100 + "%";
    previewImg.style.top = -points[1].y * previewWidthRatio * 100 + "%";

    previewResult = previewImg;
 }
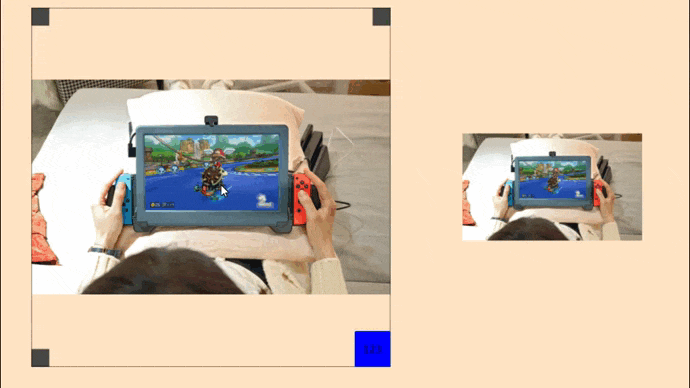
如何使用?
先宣告全域變數previewResult 乘載編輯結果。
var previewResult;
並透過按鈕呼叫本元件的 callback 方法。
 handleSubmit(e) {
    //用點的位子計算縮放比例:
    var scale =
      (1 / (this.state.points[3].x - this.state.points[1].x)) * 100 + "%";

    var data = {
      //e: e,
      scale: scale,
      src: this.state.img,
      width: e.width,
      height: e.height,
      top: e.style.top,
      left: e.style.left,
    };
    this.state.onsubmit(data);
  }
還記得我們在設定元件初始值的時候宣告了 onsubmit 方法當作傳入參數。在執行建構子時將該方法參數連接本程式的方法。
注意等號左邊的是傳入的 callback 方法參數( property ),右邊的是本程式碼的方法。
 constructor(props) {
    super(props);
    this.state = this.props;
    this.handleSubmit = this.handleSubmit.bind(this);
    this.handleURLChange = this.handleURLChange.bind(this);
  }
至此,本元件腳本結束。
外部呼叫
呼叫開啟編輯器:
將 useState() 方法當作參數傳入,使在元件裡面和下確認後能更新資料給外部元件。
const [thumbnail, setThumbnail] = useState({    src: "https://react.semantic-ui.com/images/wireframe/image.png",  });
....

<div style={{ display: openAvatarEditor ? "block" : "none" }}>
                  <AvatarEditor
                    img={thumbnail.src}
                    scale={thumbnail.scale}
                    width={thumbnail.scale}
                    height={thumbnail.scale}
                    top={thumbnail.top}
                    left={thumbnail.left}
                    onsubmit={(e) => {
                      setThumbnail(e);
                      setOpenAvatarEditor(false);
                    }}
                    oncancel={(e) => {
                      setOpenAvatarEditor(false);
                    }}
                  ></AvatarEditor>
                </div>
透過更新圖片大小、上下錨點呈現效果。
💡 注意圖片大小是紀錄縮放百分比例而不是固定的px數值,如此在不同大小的物件下才能正常顯示。 (例如:編輯頁面的預覽圖片大小是300X300px,但在小屋清單上是200X200px,若紀錄的是圖片的px數值,則會發生跑版)
<img
                      src={thumbnail.src}
                      className="createArticle__image"
                      style={{
                        width: thumbnail.scale,
                        height: thumbnail.scale,
                        top: thumbnail.top,
                        left: thumbnail.left,
                      }}
                    ></img>